Handgrading
Handgrading is the staff-facing interface for human review of student submissions. Graders view a submission’s files and artifacts, apply rubric checks, leave inline annotations, and mark grading complete so instructors can release results to students. Instructors can define multiple handgrading rubrics for each assignment, though the most typical setup is a single “Grading Rubric” whose score (combined with the autograder score) determines the submission’s grade. For the rubric schema and configuration, see Rubrics. For assigning graders to submissions or rubric parts, see Grading Assignments.Grading status dashboard
The assignment landing page shows a grading status dashboard with:- Overall grading progress across all submissions
- Individual grader workload and completion status
- Pending grading tasks organized by grader
- Quick access to ungraded submissions
Grading submissions assigned to you
When you have submissions assigned to grade, a summary appears on the assignment’s landing page.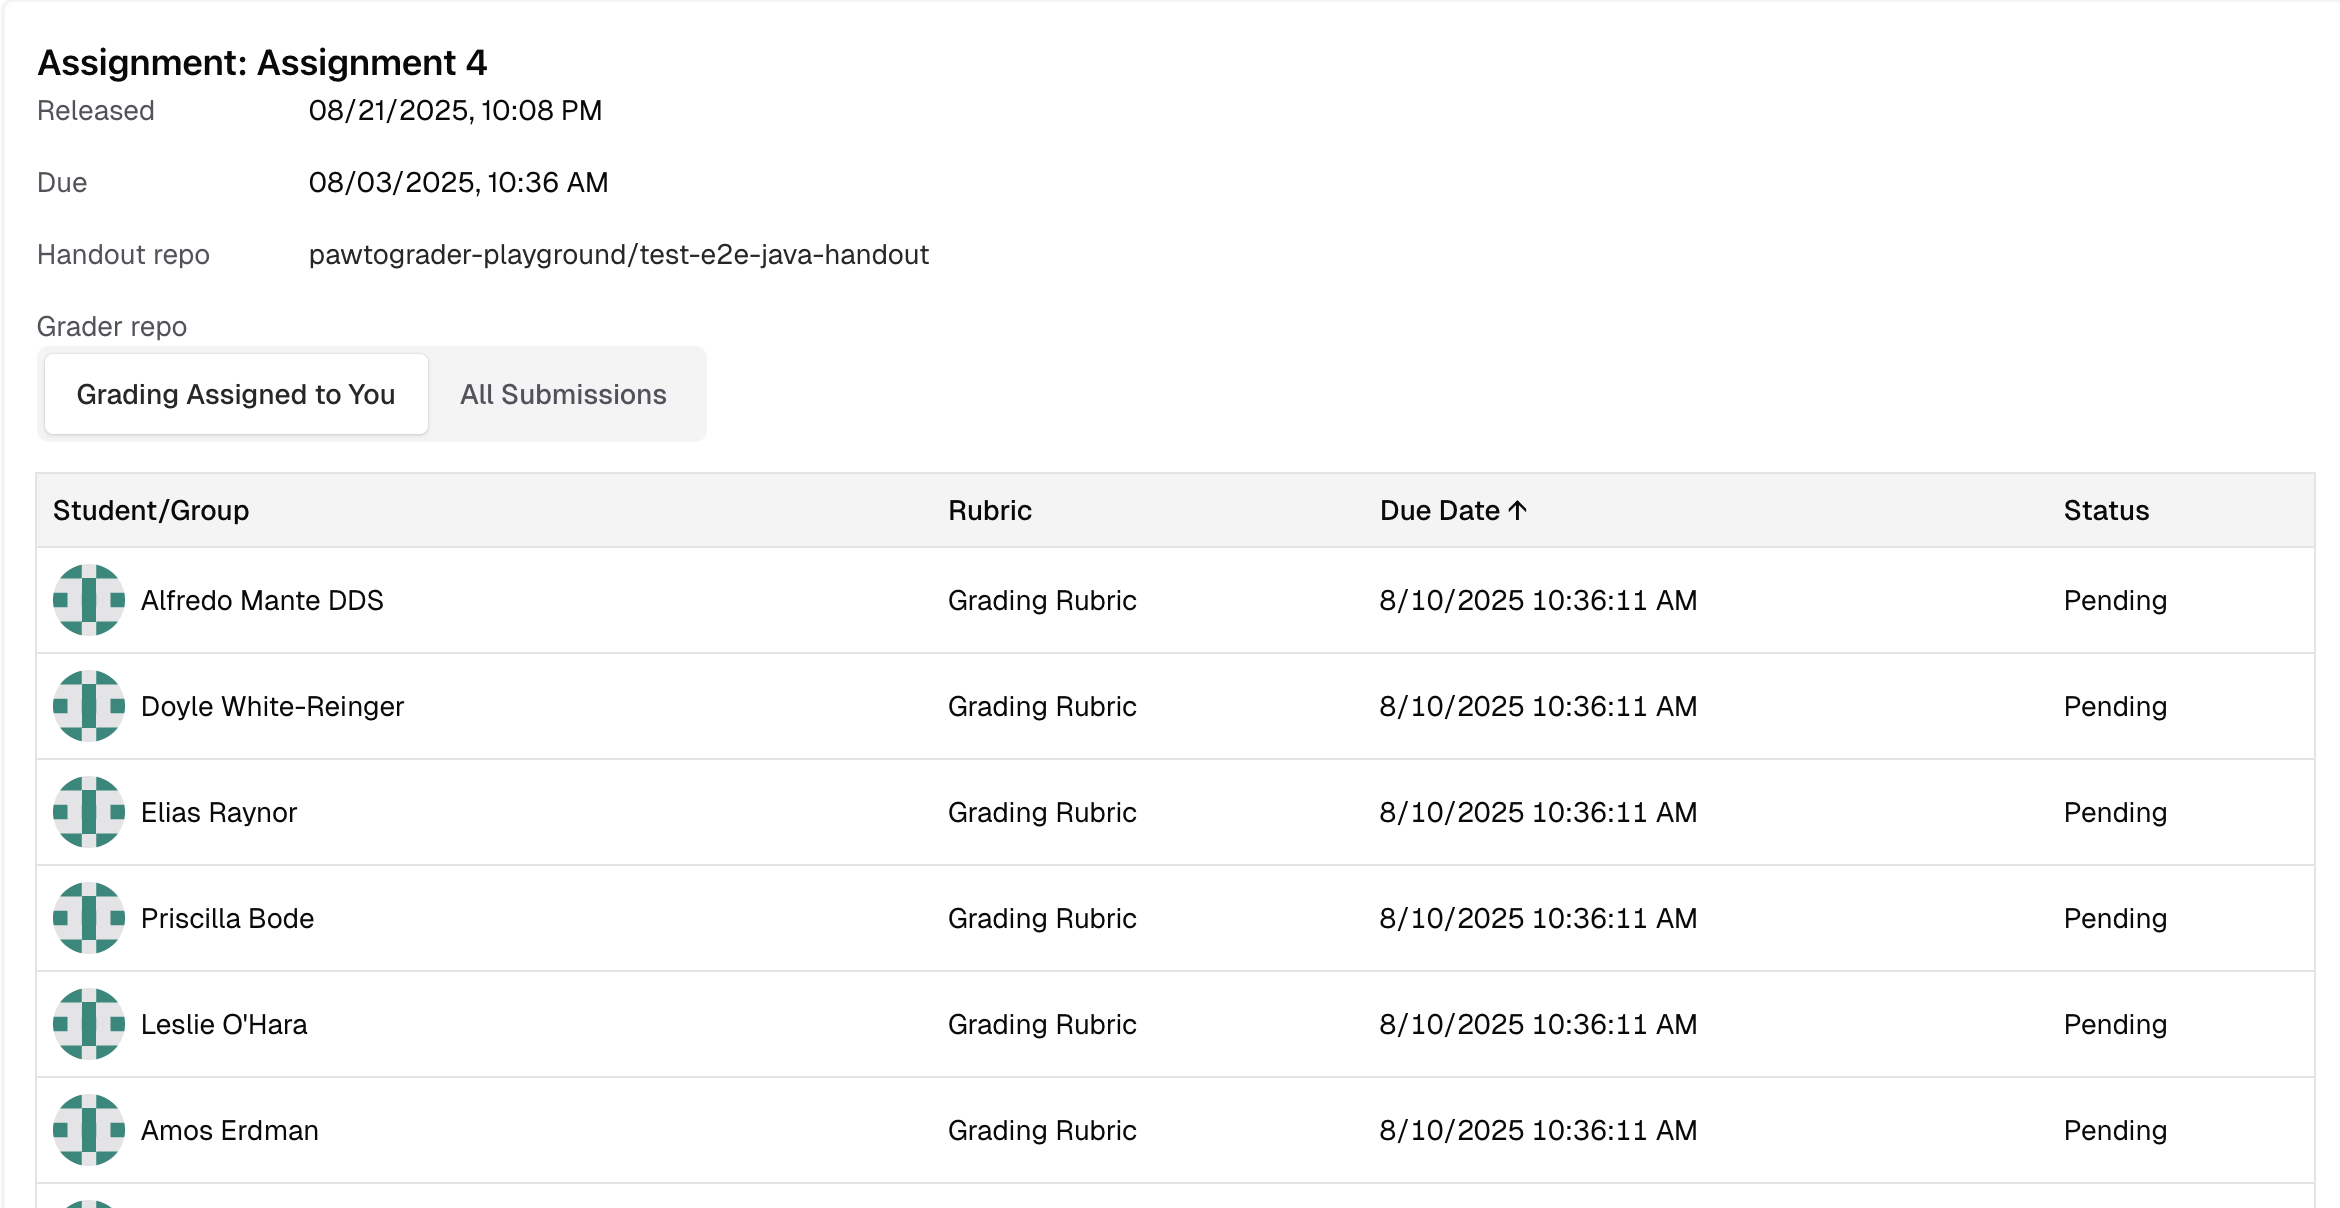
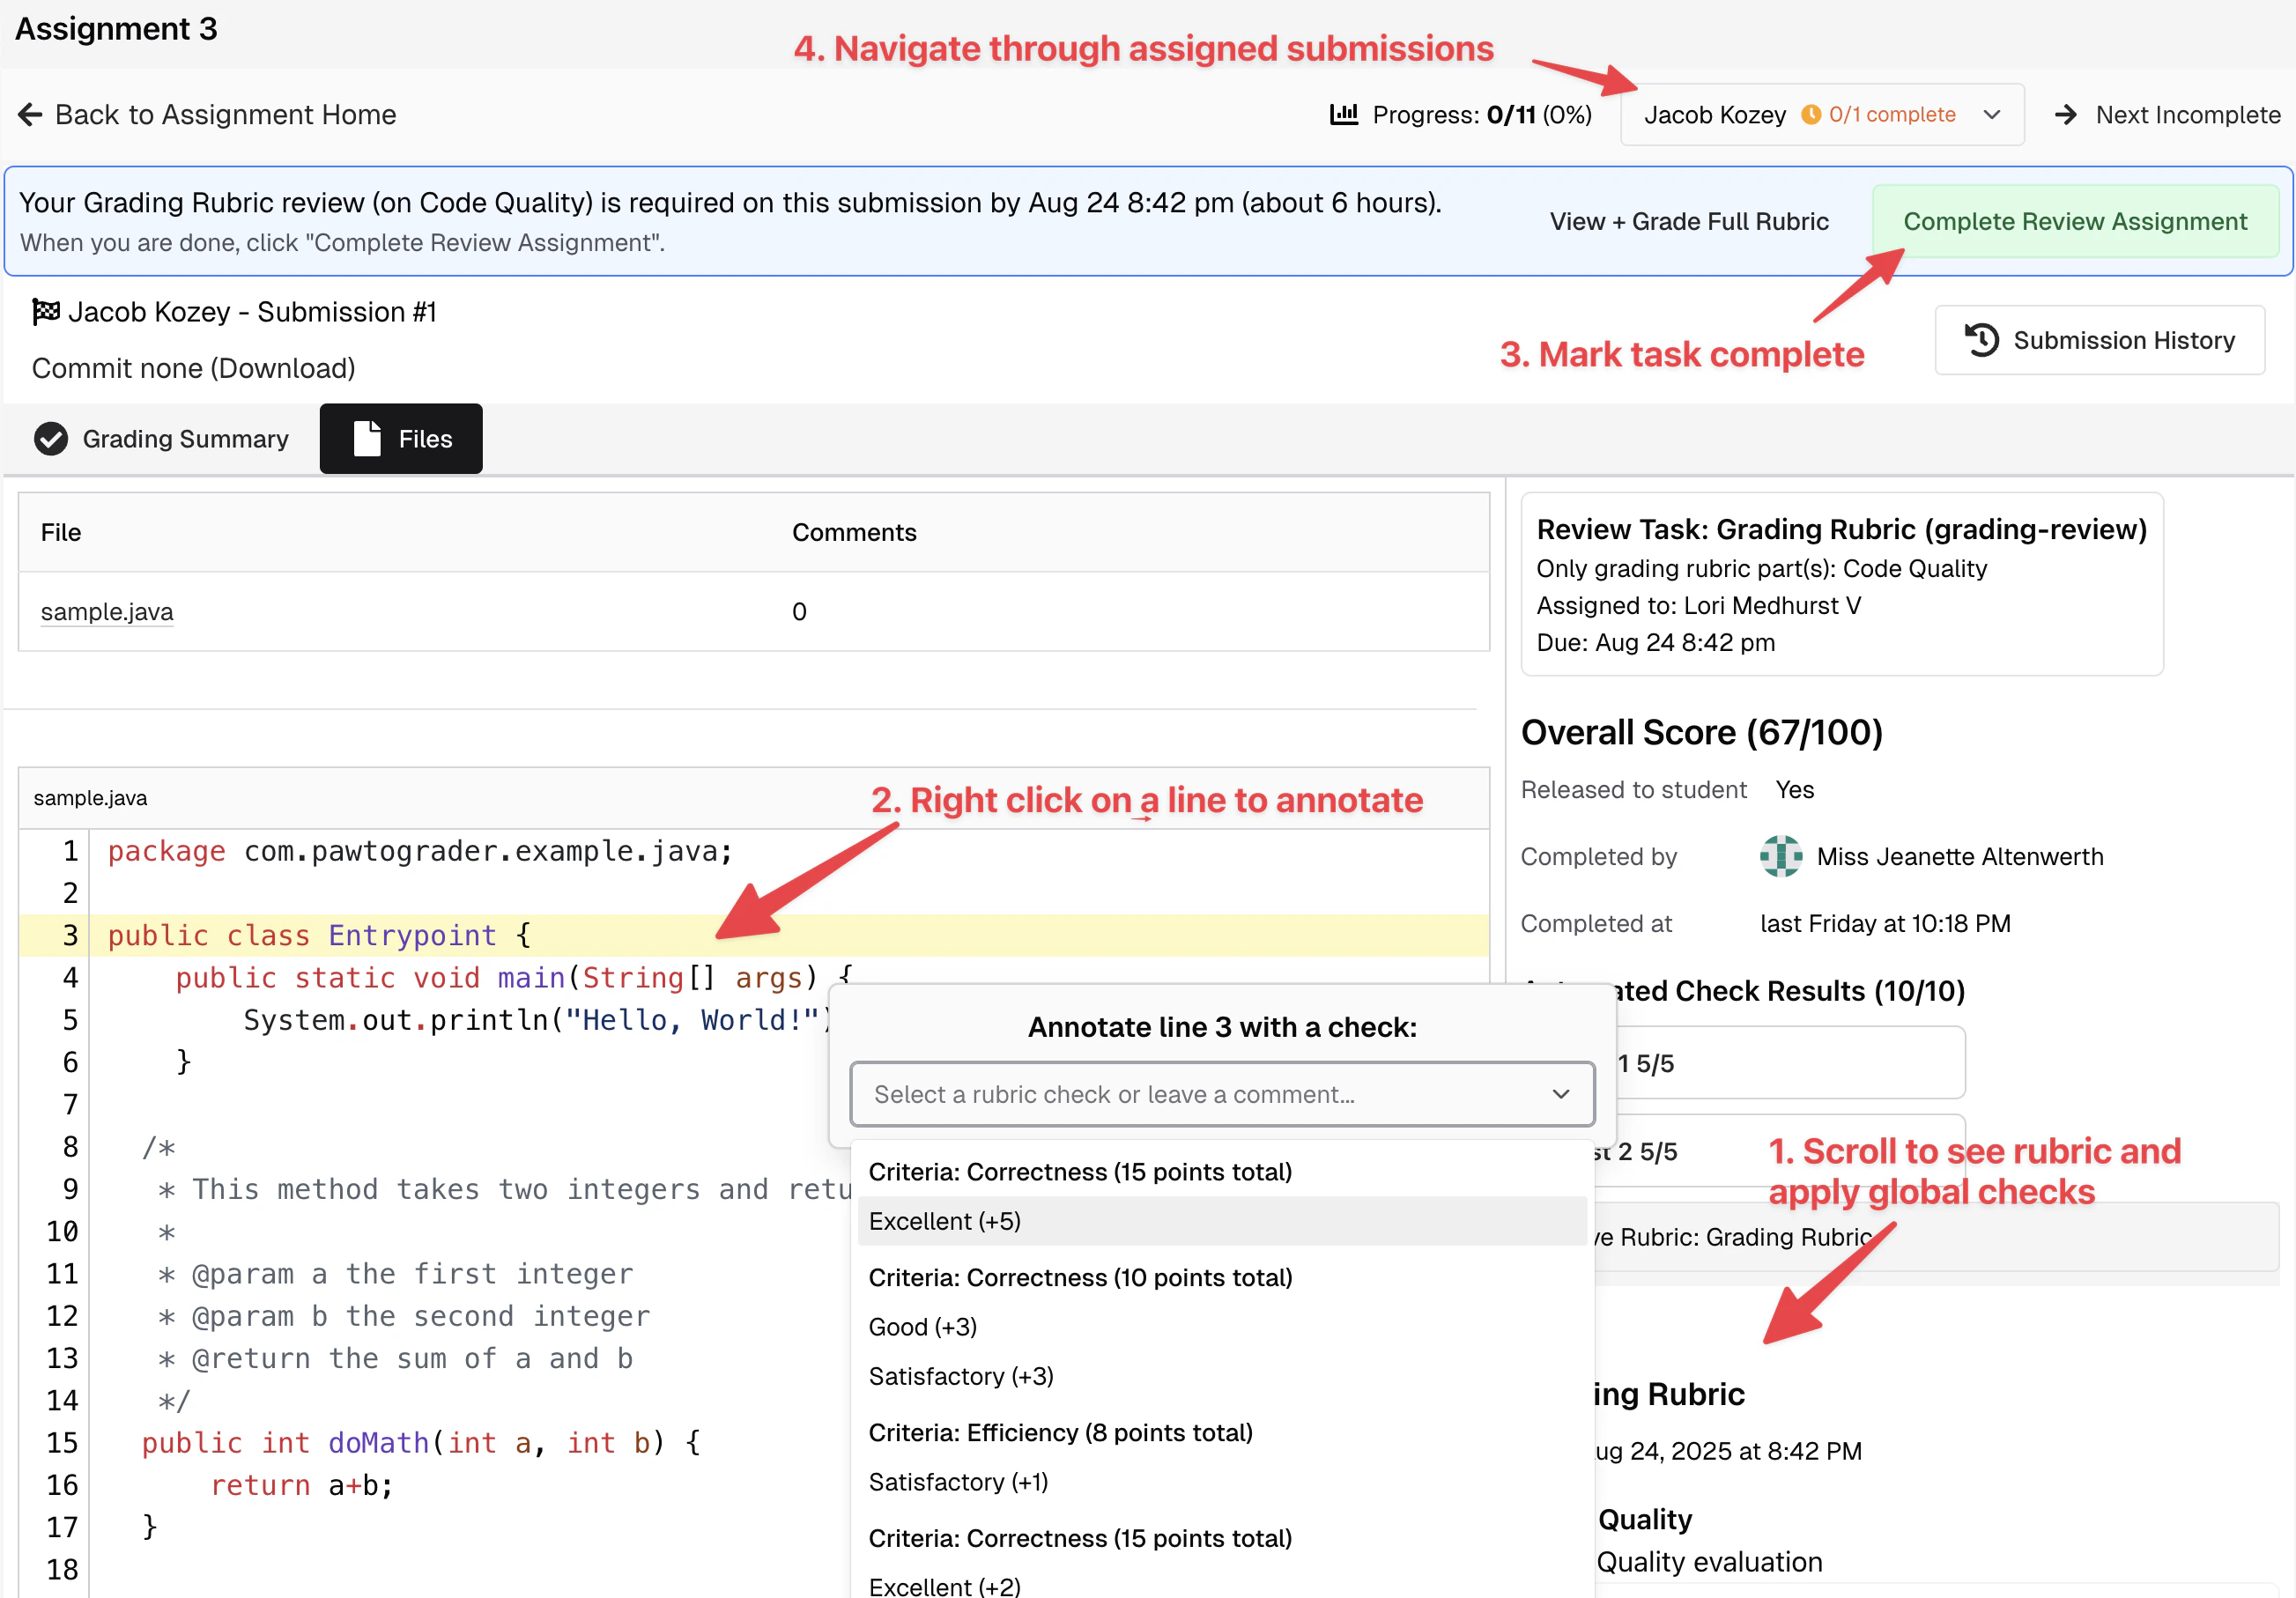
- A Files tab showing the submission’s source files with syntax highlighting. Plaintext and markdown files render directly in the browser.
- An Artifacts tab showing any files generated by the autograder (logs, reports, coverage data, etc.). Rubric checks can link directly to specific artifacts.
- A rubric sidebar showing the parts you have been assigned to grade.
Grading submissions without an assignment
If you have not been assigned any submissions, the assignment landing page shows the full list of submissions instead.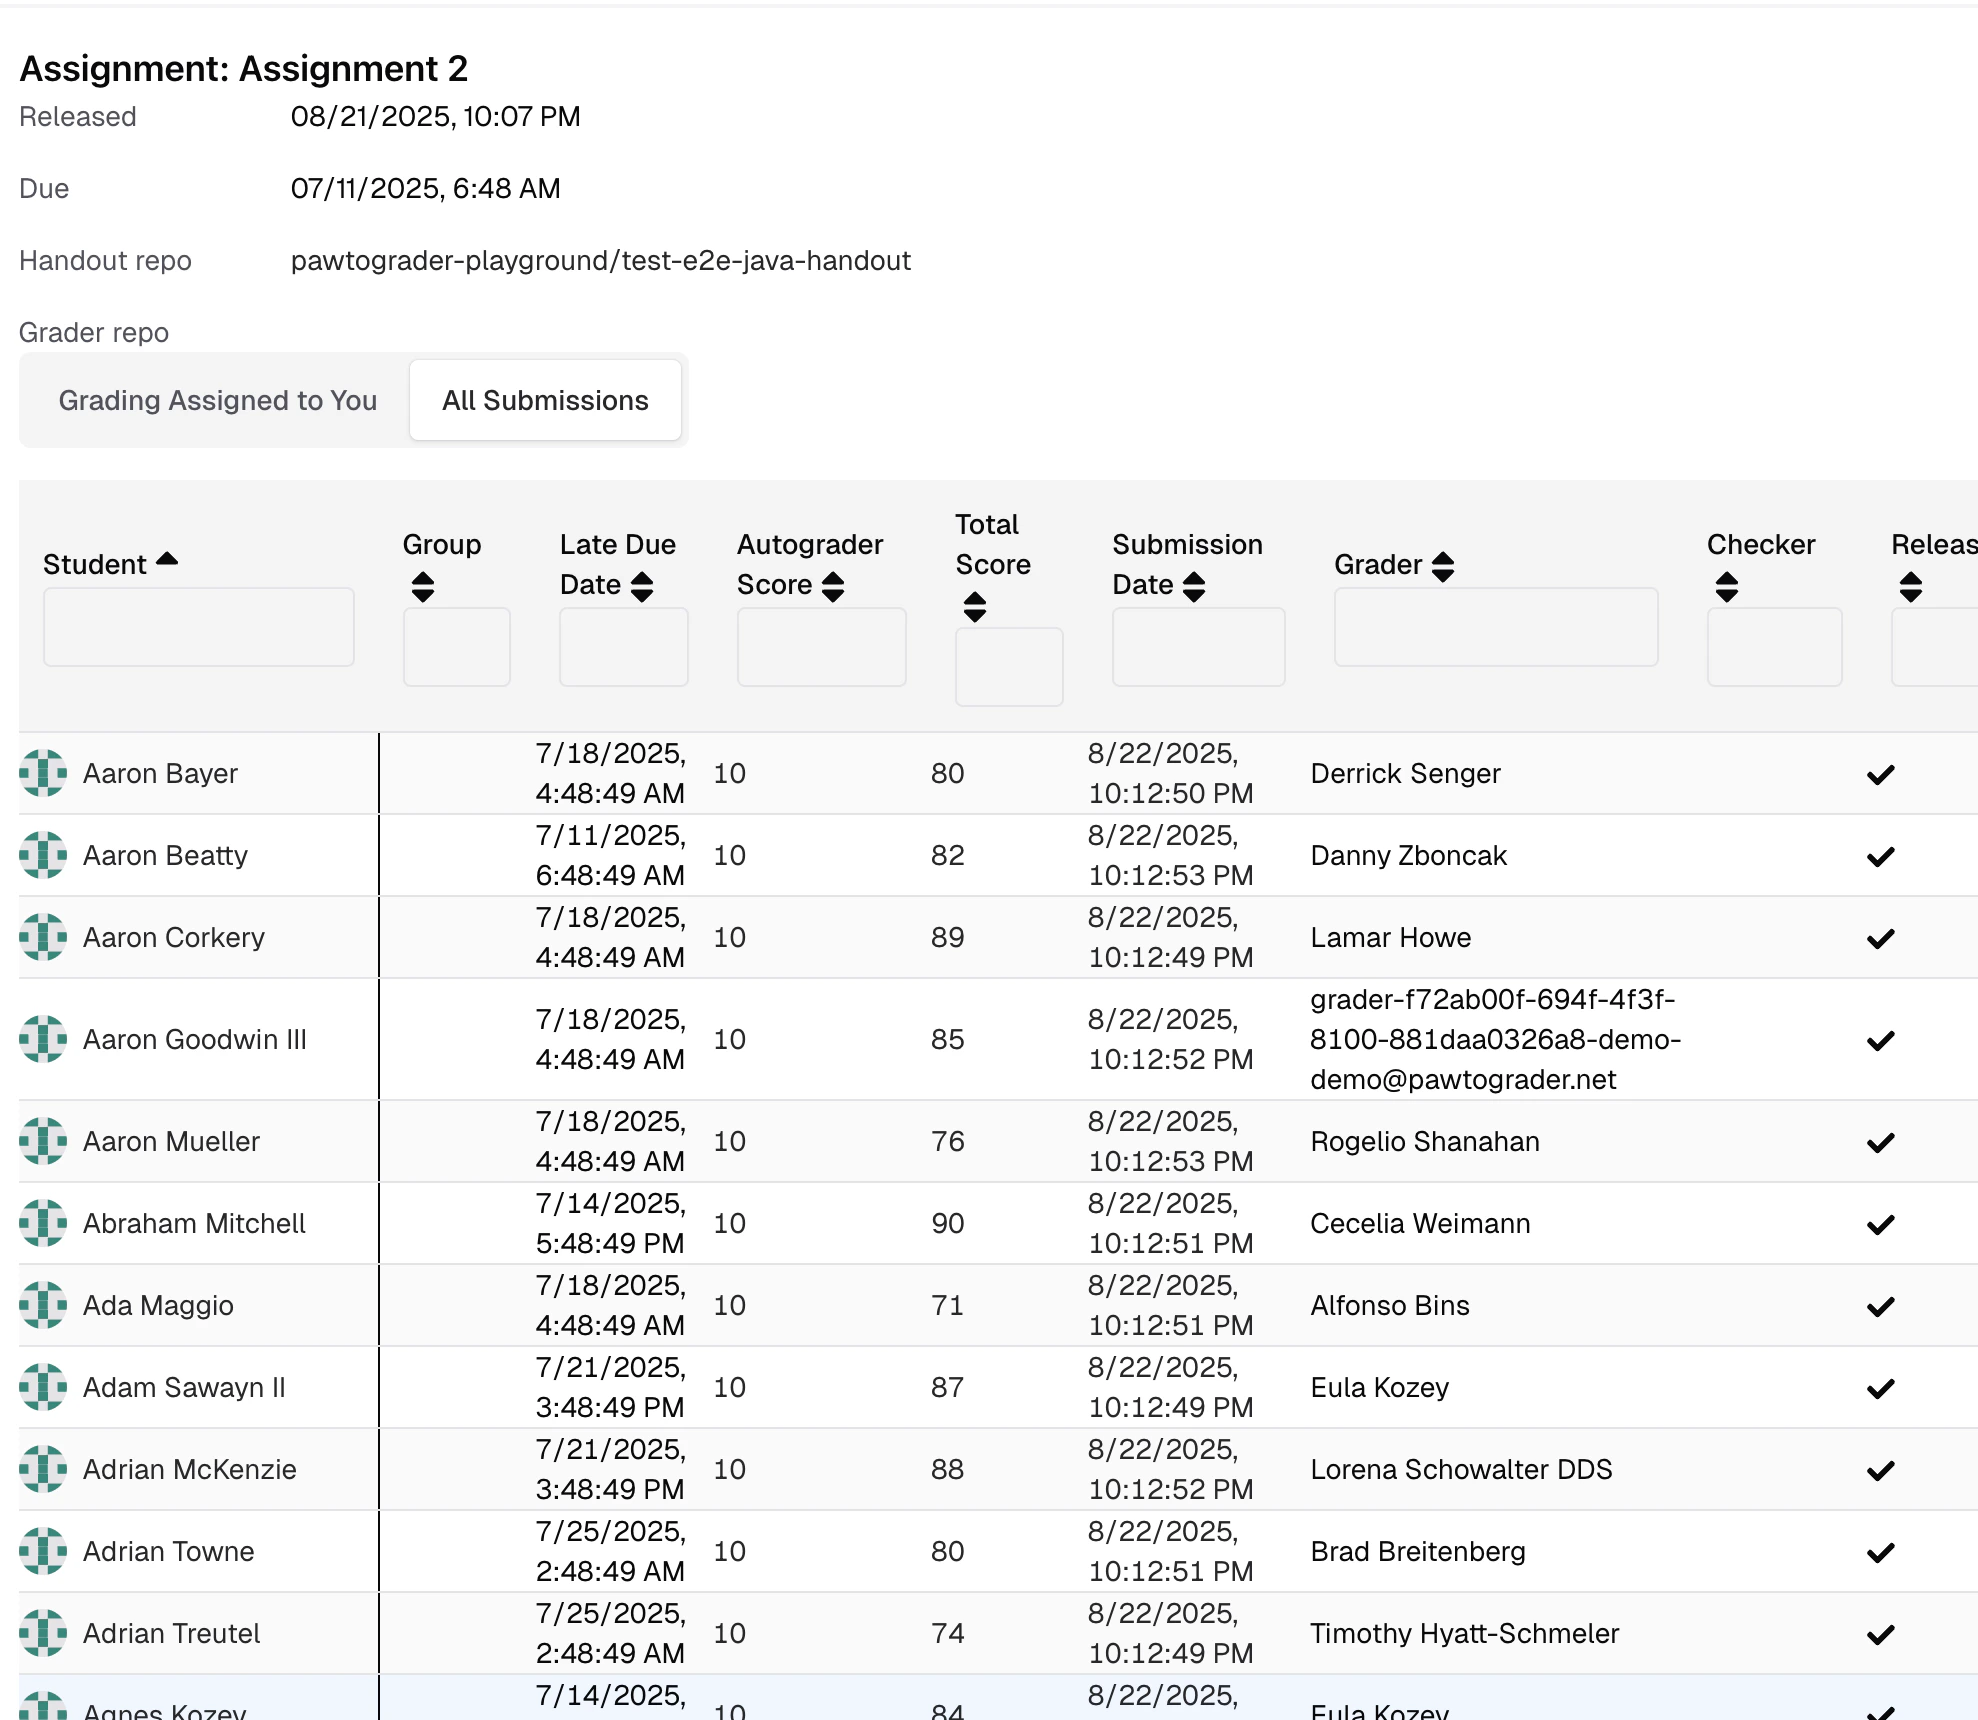
Viewing files and artifacts
The grading interface supports a range of file types in both the Files and Artifacts tabs.| Format | Rendering |
|---|---|
| Source code | Syntax highlighting, line numbers |
Plain text (.txt, .log, .csv) | Inline view with line numbers and copy support |
Markdown (.md) | Full formatting: headers, lists, code blocks, links, tables |
| HTML | Sandboxed iframe with CSS preserved |
| Browser PDF viewer with page navigation and zoom | |
| Other binary | Download link |
reports/*.md or output.txt). They typically contain test output, generated reports, coverage data, or other deliverables that provide context for grading.
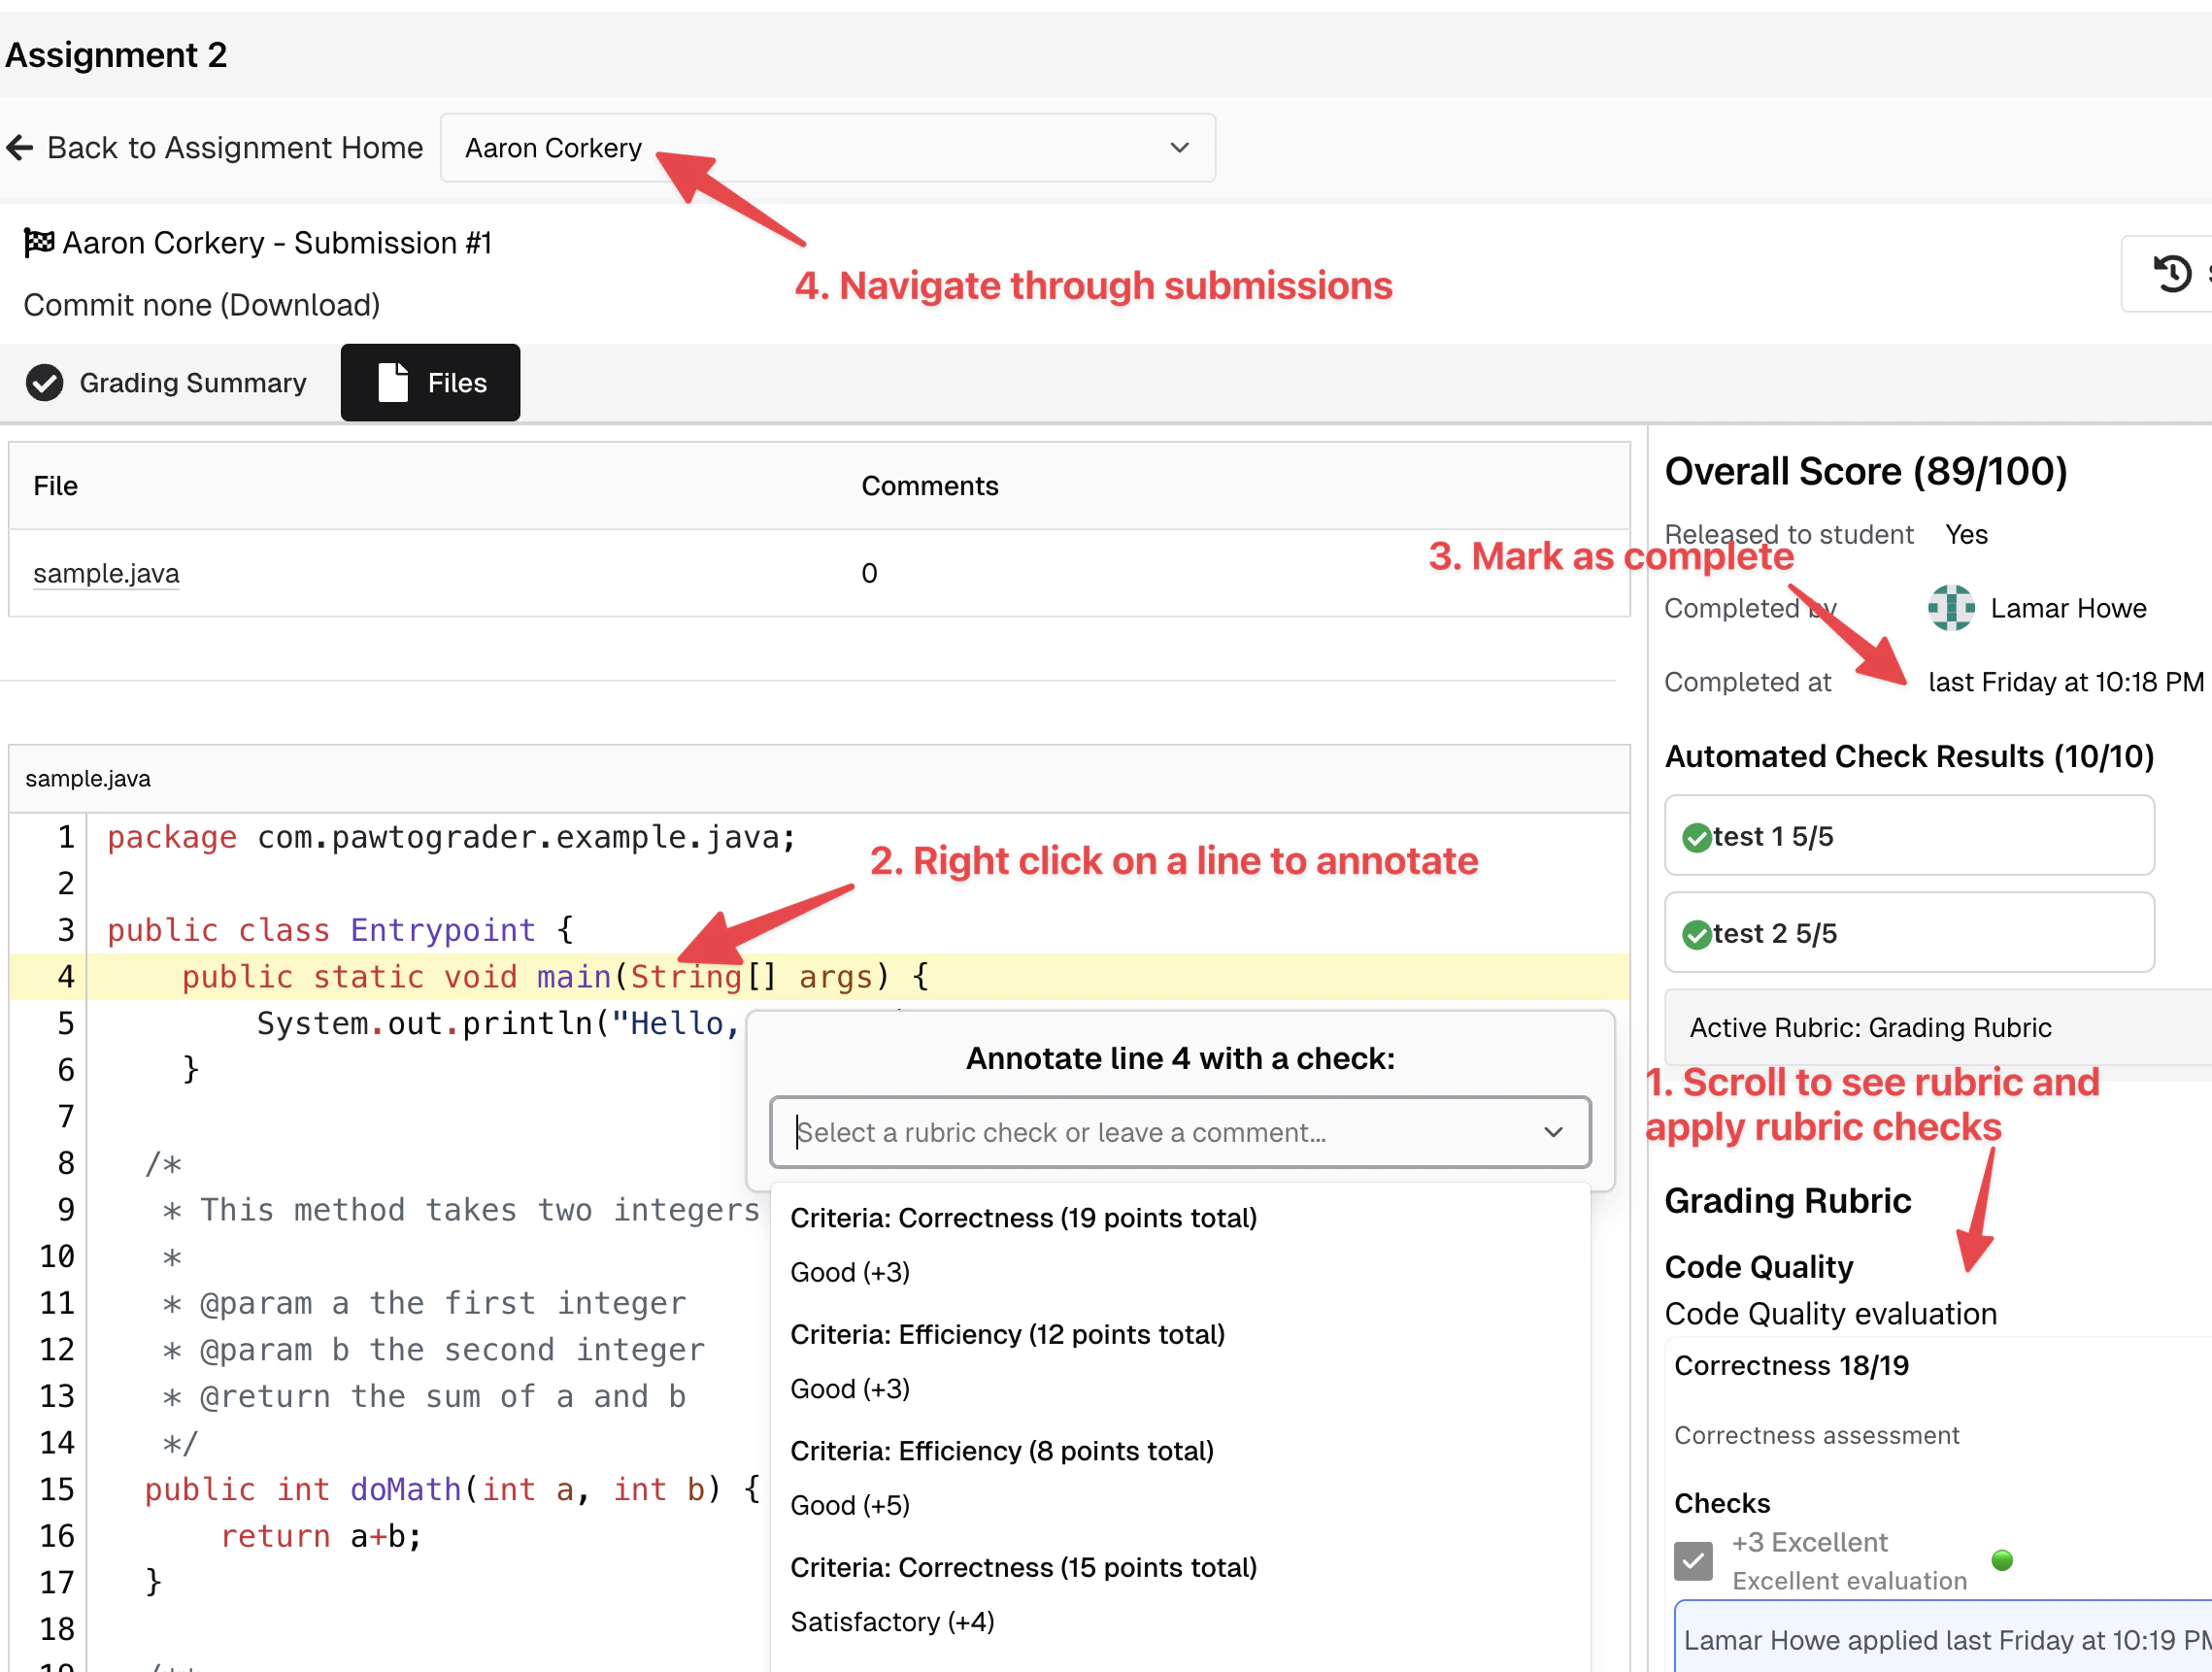
Applying rubric checks and annotations
Rubric checks are applied from the rubric sidebar. For checks that target specific lines of code or sections of an artifact, you can leave inline annotations:- Open the Files or Artifacts tab.
- Click on the line (or section, for markdown) you want to annotate.
- Choose a rubric check from the annotation menu.
- Add an optional comment.
Grade overrides
When overriding a calculated grade, you can add a note explaining the reason for the override. The note is visible in the grading interface to track why a manual adjustment was made.Individual grading for group assignments
For group assignments, rubric parts can be configured so each group member is graded separately rather than once for the entire group.Individual grading mode
Mark a rubric part withis_individual_grading: true:
Assign-to-student mode
Mark a rubric part withis_assign_to_student: true to let the grader choose which student a part applies to (or skip it if it doesn’t apply to anyone):
A rubric part cannot be both
is_individual_grading and is_assign_to_student. Choose the mode that best fits your grading needs.Viewing individual scores
When a group submission has individual grading components, the submission view shows a Scores by student breakdown:- Shared: Points from whole-group rubric items, autograder, and manual adjustments
- Individual: Points from that student’s individual rubric sections
- Total: Combined score, capped to the assignment maximum if configured
Completing a review
Once all required rubric checks are applied, click Complete Review to mark the review done. This does not release the review to the student; it indicates to the instructor that the review is ready to be released. When you complete an assigned rubric part, Pawtograder will also automatically complete any other review assignments on the same submission whose assigned parts are a subset of yours. For example, if you complete parts A, B, and C, another grader assigned only to A+B has their assignment auto-completed.Editing after completion
TAs can edit or delete rubric scores, comments, and annotations after marking a review complete. Just navigate back to the submission and make your changes — the review stays marked complete, and the updates take effect immediately. There is no need to “uncomplete” a review to make corrections. Once an instructor releases the review to the student, only instructors can make further edits. See Grading after release below.Bulk operations
Mark All Grading Complete
Use Mark All Grading Complete on the assignment’s All Submissions tab to mark every eligible submission review complete in one step:- Click Mark All Grading Complete.
- A popover summarizes:
- How many incomplete reviews can be marked complete
- How many reviews have missing required checks (these will be skipped)
- Click the checkmark to confirm.
Bulk Complete Reviews
For finer-grained bulk completion, use the Bulk Complete action on the Grading Progress page:- Filter incomplete reviews by grader, due date, rubric part, or completion status.
- Select the reviews you want to complete using the checkboxes.
- Click Bulk Complete.
- Optionally choose to preserve existing grades, apply default scores, or excuse from grading.
- Optionally add a note explaining the bulk action.
- Click Confirm Bulk Complete.
- Completing reviews for graders who finished their work but forgot to click Complete Review
- Excusing students who dropped the course
- Closing out a grading period at the end of the semester
- Marking placeholder reviews complete
Reassigning grading work
Instructors can reassign a submission or rubric part to a different grader at any time, even after grading has been partially or fully completed. Reassignment is useful when:- A grader is unavailable and their work needs to be redistributed
- Workload needs to be rebalanced across graders
- A specific grader’s expertise is needed for certain submissions
- Open the assignment’s grading management page.
- Select the submissions or rubric parts to reassign.
- Choose the new grader from the dropdown.
completed_at timestamp is reset so the new assignment shows up correctly — even if the grader already completed a different rubric part on the same submission.
Submission resubmissions
When a student submits a new version of their work, Pawtograder handles the reassignment automatically:- Review assignments move to the new active submission and are reopened (completion status cleared).
- Existing comments remain attached to the original submission they were written for, so graders can see their previous feedback in context.
- The new submission starts fresh without carrying over old comments.
Grading after release
Once an instructor releases a review to students, grading comments on that review are locked for non-instructor graders. Only instructors can edit or delete comments on a released review.After a review is released to students, grading comments can no longer be edited or deleted by graders. This protects the integrity of feedback that students have already seen. If changes are needed after release, an instructor must unrelease the review, make edits, and re-release it.
Rerunning the autograder
Instructors can rerun the autograder on an existing submission without creating a new submission — useful after fixing an autograder bug, updating tests, or regrading with a different grader version.- Open the submission to regrade.
- Click Rerun Autograder.
- In the regrade dialog:
- Select a grader version from the dropdown, or enter a specific commit SHA.
- Choose whether to auto-promote the regraded submission to be the active submission.
- Click Regrade.