

Lab Sections
A lab section is a named weekly meeting that belongs to a course. Each section has a day of the week, a start time, an optional end time, an optional room, and one or more staff members who lead it. A student can belong to at most one lab section per course. Lab sections do more than label the roster. Pawtograder generates a dated meeting for every occurrence of the section’s day between the course start and end dates, and an assignment can set its deadline relative to each student’s most recent lab meeting. That is why lab sections show up as a prerequisite on several other pages: grading assignment by lab leader, lab-based due dates, and the section filters and columns on dashboards, the gradebook, surveys and exports all read from them.Two pages with the same name
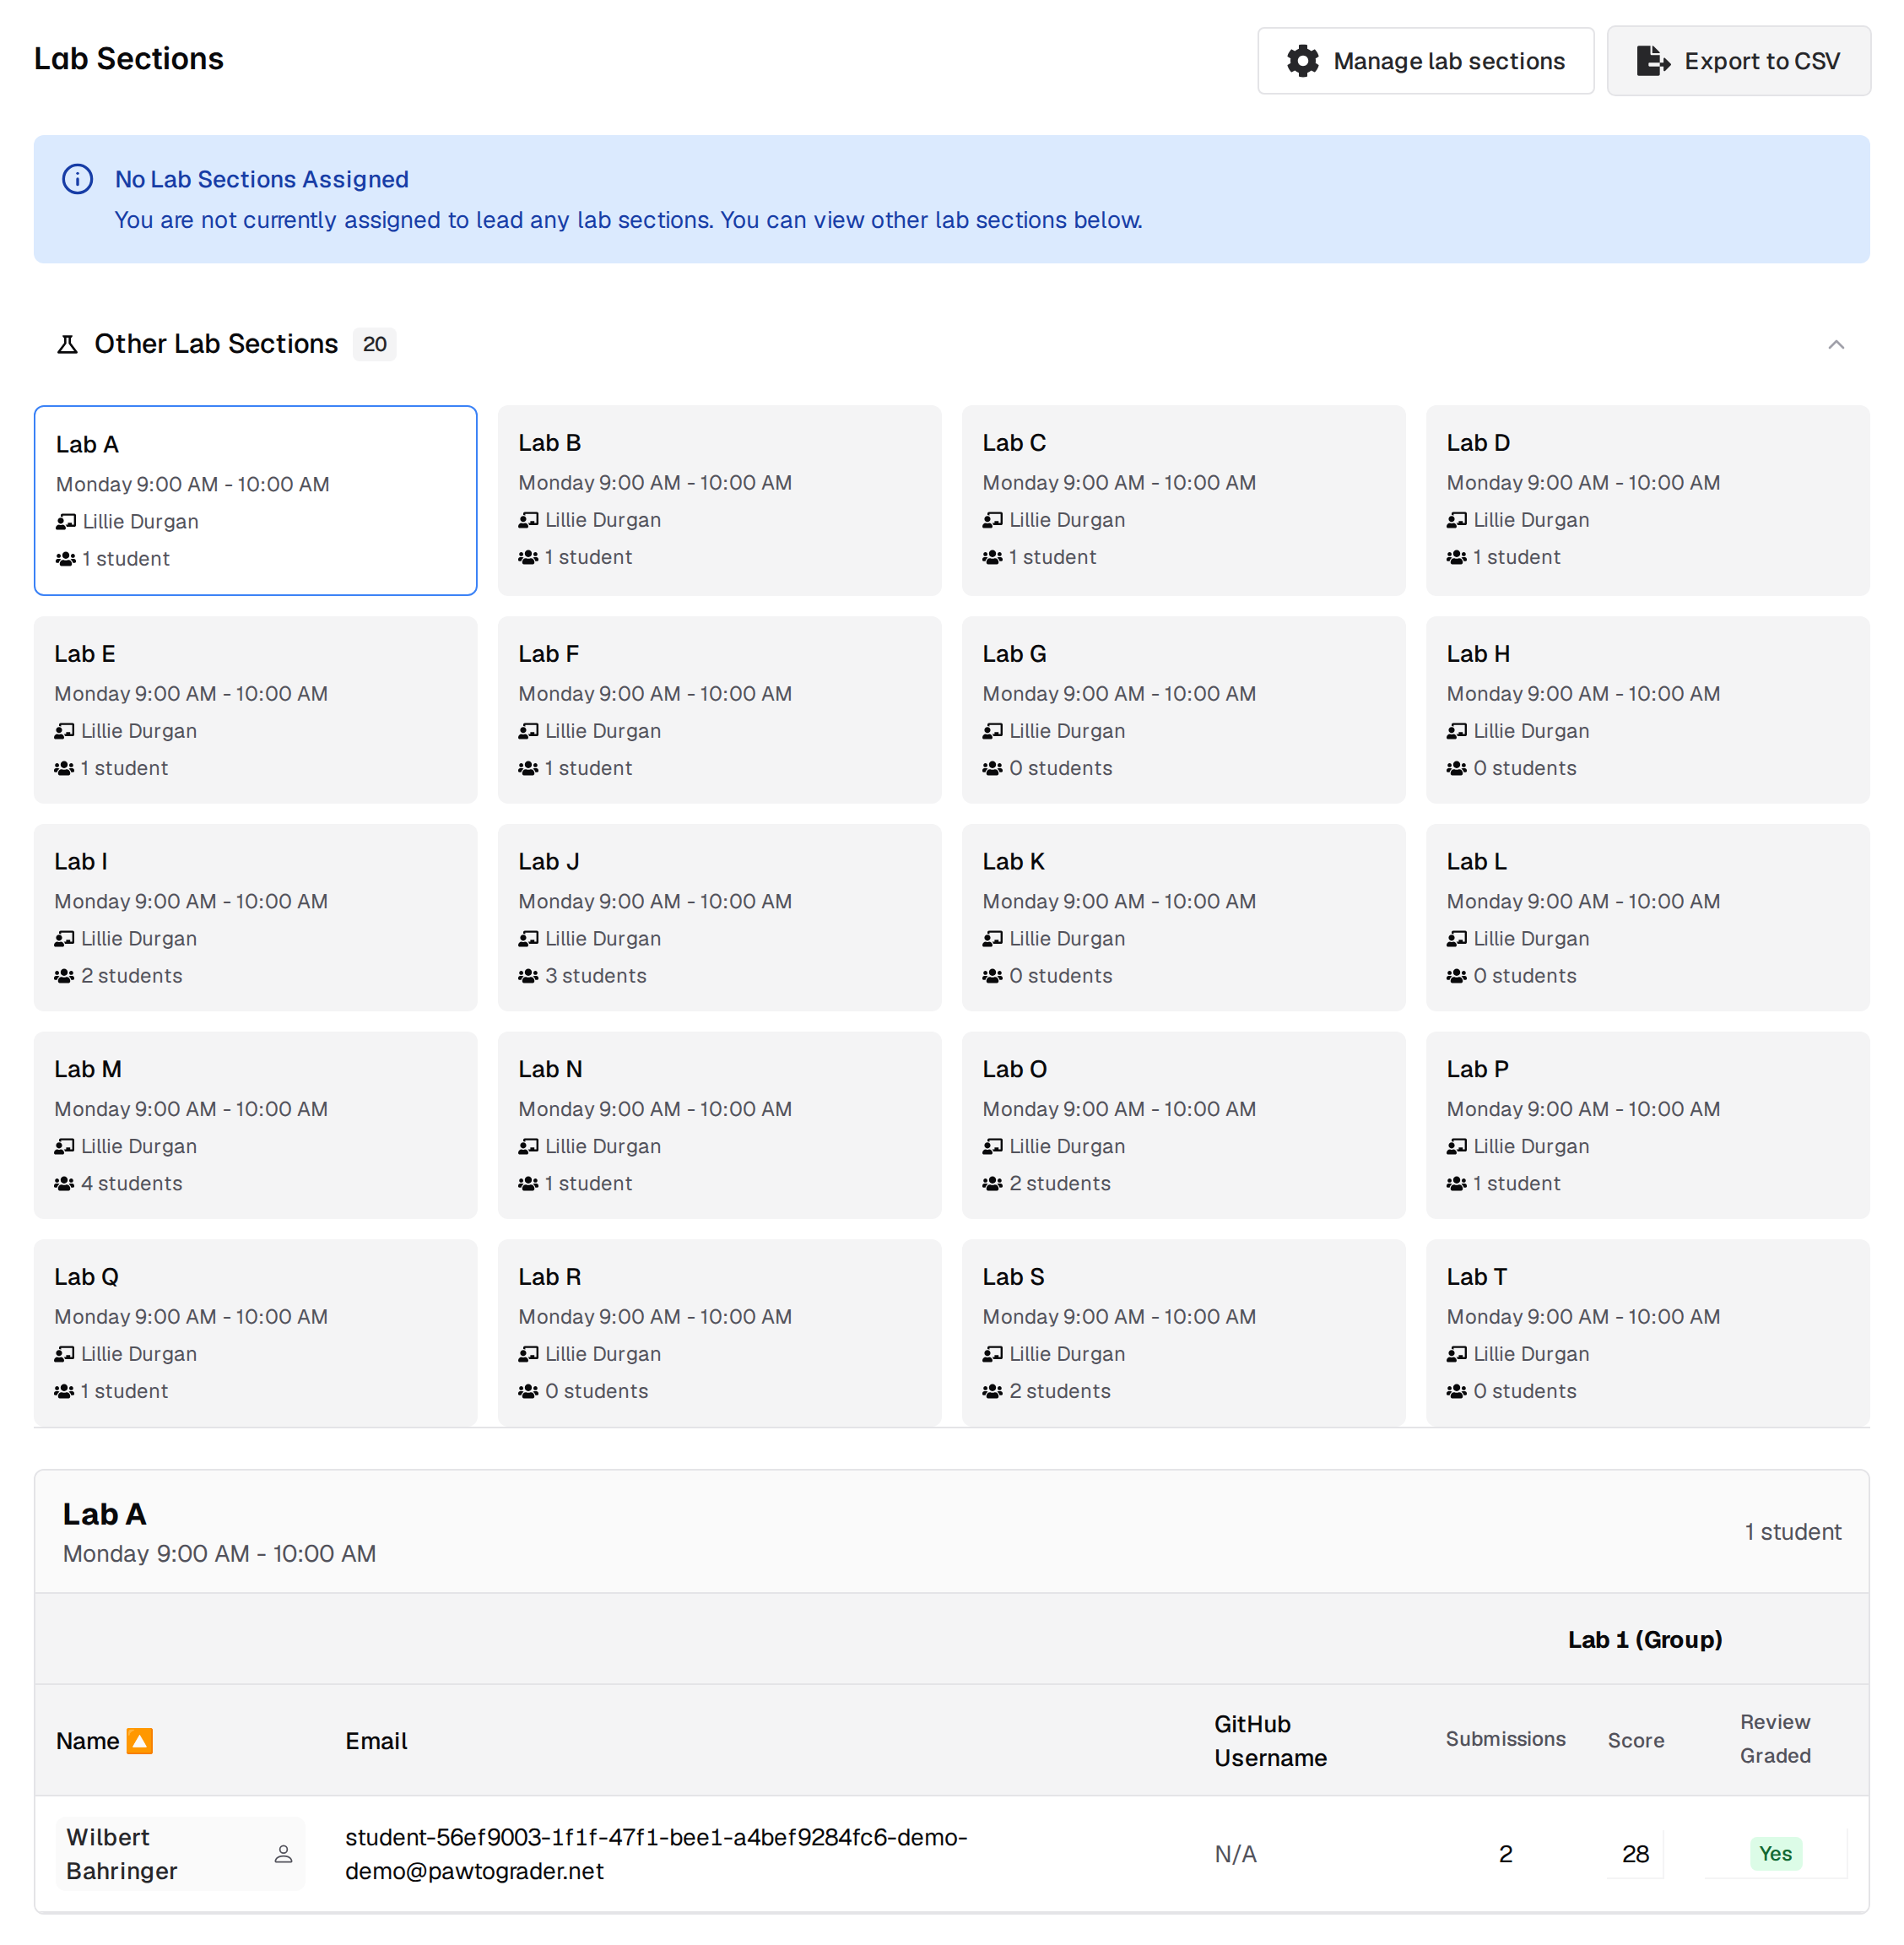
Course Settings → Lab Sections is visible to instructors and graders, and it opens the lab roster atmanage/course/lab-roster. The roster is read-only: it
shows which students are in each section, plus a CSV export.
manage/course/lab-sections.
Nothing in the Course Settings menu points there. Instructors reach it through the
Manage lab sections button in the top-right corner of the roster; graders do
not see that button.
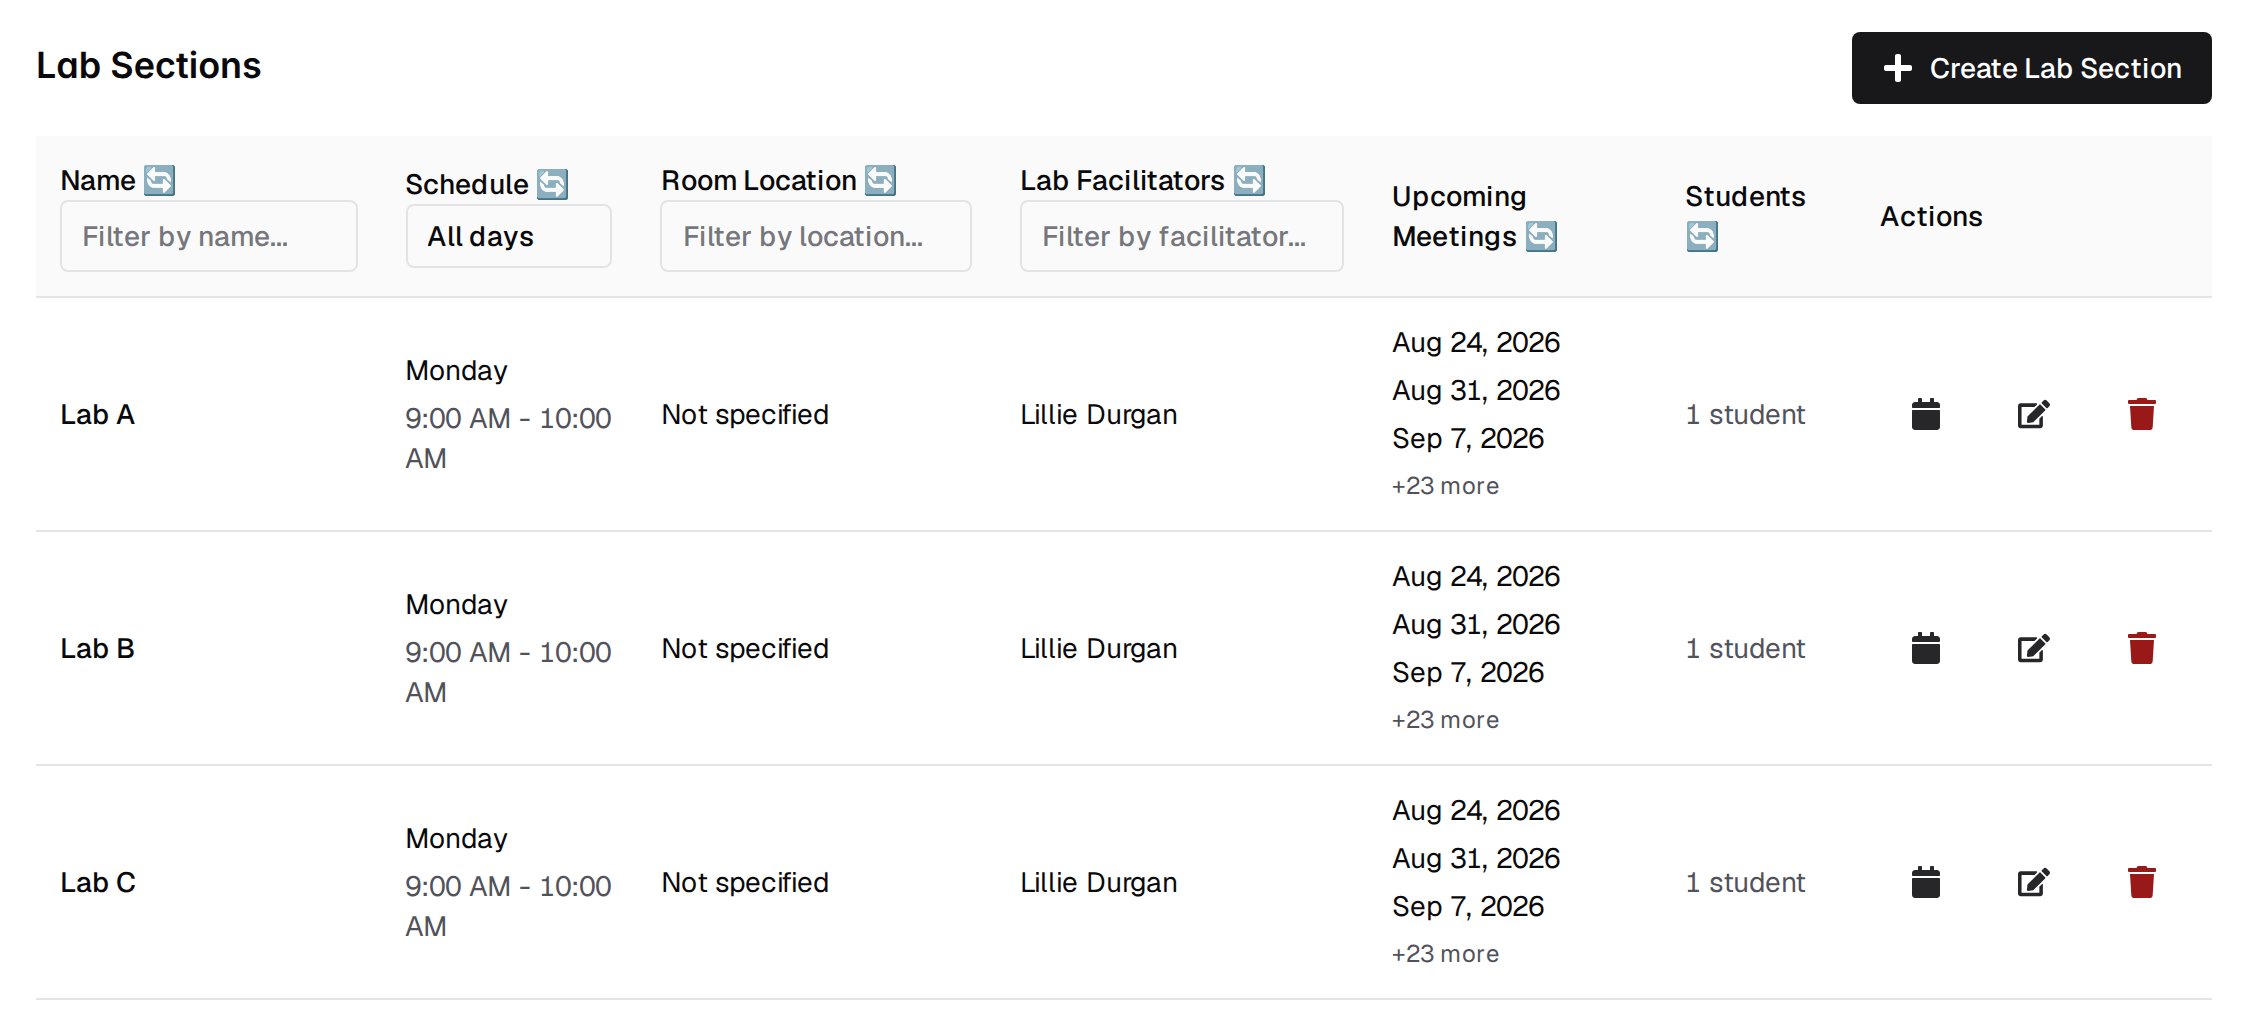
Both pages put the heading Lab Sections at the top, so the heading will not
tell you which one you are on. Look at the buttons instead: the roster has
Export to CSV, and the editor has Create Lab Section.
Creating a section
On the editor, click Create Lab Section to open the dialog. It has six fields: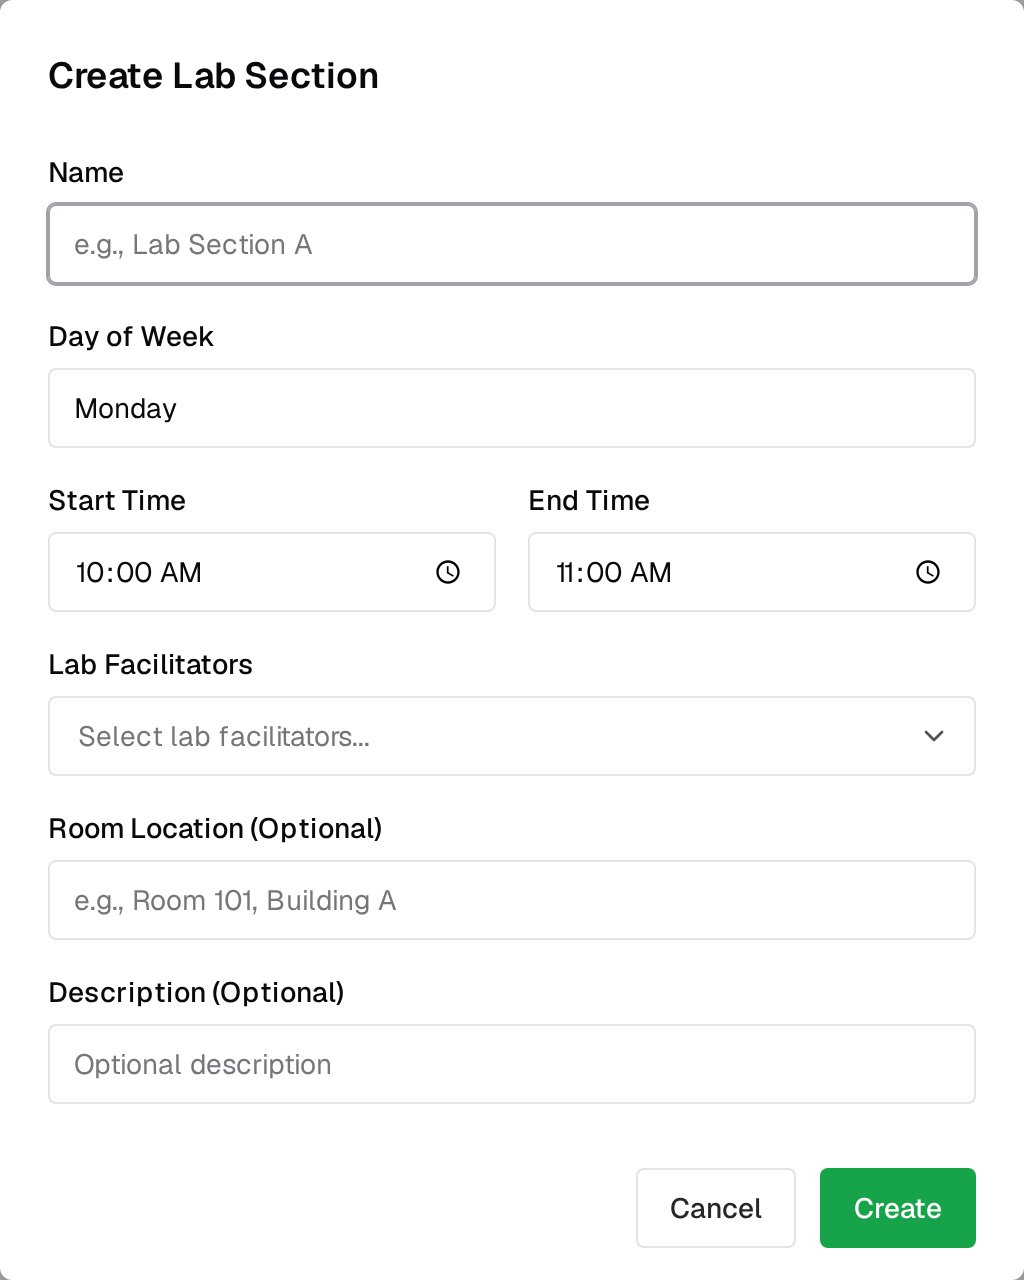
- Name is required. The dialog suggests a form like
Lab Section A. - Day of Week is required, and offers Monday through Sunday. It defaults to Monday.
- Start Time is required and defaults to 10:00. End Time is optional, defaults to 11:00, and must be later than the start time.
- Lab Facilitators is required, and at least one must be selected. The list offers every instructor and grader in the course, with their role shown after the name.
- Room Location is optional.
- Description is optional, and appears under the section name in the table.
The dialog calls these staff Lab Facilitators. The rest of Pawtograder calls
the same people lab leaders: the roster labels them section leaders, and bulk
grading assignment offers Assign to lab leaders. They are one list.
Meetings are generated for you
When you create a section, Pawtograder immediately generates one meeting for every occurrence of the chosen day between the course start date and the course end date. You do not enter meeting dates by hand. To adjust the generated list, click the calendar icon in the section’s Actions column. The Manage Meetings dialog lists each meeting with its date, a status of Scheduled or Cancelled, notes, and a per-row button that toggles between Cancel and Restore. Add Meeting adds an off-schedule date, which inherits the section’s scheduled start and end time.Deleting a section
The trash icon deletes a section after a confirmation prompt. The delete is permanent: the section’s meetings and facilitator assignments are removed with it, and every student who was in that section has their lab section cleared rather than reassigned.The section list
The editor’s table has one row per section, sorted by name, 50 rows per page:Name, Room Location and Lab Facilitators have text filters in the header
row, and Schedule has a day-of-week dropdown.
Who is in each section
The roster opens on the sections you lead, shown as cards under Your Lab Sections with the section name, schedule, facilitators and student count. Every other section is behind the Other Lab Sections accordion, in the same card format. If you lead no sections, a No Lab Sections Assigned notice appears and the accordion opens by default with the first section selected. Select a card to load its students. The table lists only active students assigned to that section, sorted by name, withName, Email and GitHub Username. Each
name is a link that opens that student’s summary page in a new tab, and hovering
it shows their class and lab section.
After those three columns, the table adds a group of three columns per lab
assignment:
Submissions— how many submissions the student has for that assignmentScore— the score on their most recent submission, linked to that submission when one existsReview Graded— a greenYeswhen that submission’s grading review is marked complete, an orangeNowhen it is not, and a dash when there is nothing to grade
lab. Only released, non-archived
assignments appear, newest release first. The two newest are shown; when there are
more, a Show all N labs button expands the rest.
The roster does not track attendance. It reports submissions, scores and review
status for lab assignments, not who came to the meeting.
Exporting the roster
Export to CSV downloads the currently selected section aslab-roster-<section>-<date>.csv. The button is disabled when the selected
section has no students.
The file covers one section, students only, and its columns are Lab Section,
Name, Email, GitHub Username, followed by three columns per visible lab
assignment. If you want every lab in the file, click Show all N labs before
exporting. See Exporting Course Data for how this
export compares to the others.
How students get assigned to a section
Neither the roster nor the enrollments table has a control that puts a student in a lab section. Assignment comes from the roster sync with your university Student Information System or LMS:- The lab section carries a SIS CRN. Sections you create in the editor have no CRN, so they are not linked to any SIS section; editing a linked section preserves its CRN.
- The sync reads each roster member’s lab section and matches it to a Pawtograder lab section by CRN.
- The matched section is written onto the student’s enrollment, or onto their pending invitation if they have not enrolled yet.
Lab meeting times as assignment deadlines
On the assignment form, check Custom due date based on lab meeting time to tie the deadline to each student’s lab. The checkbox reveals Minutes due after lab meeting, which defaults to 60, and a Lab Section Due Date Preview table listing every lab section with the effective due date it would produce. Pawtograder computes the deadline per student:- Find the student’s lab section. If they have none, they get the assignment’s plain due date.
- Within that section, find the most recent meeting that is not cancelled and whose end time falls at or before the assignment’s due date. If no meeting qualifies, the student gets the plain due date.
- Add the Minutes due after lab meeting offset to that meeting’s end time, in the course time zone.
Where else lab sections are used
- Grading. Bulk grading assignment offers Assign to lab leaders, which assigns each submission to all lab leaders of that student’s section with no manual grader selection. See Grading Assignments.
- Filters and columns. The assignment dashboard, the security dashboard, the gradebook grid and its export, and survey response filters all carry a lab section dimension.
- Students. A student’s course dashboard shows a card for their lab section with its meeting time and lab leaders.